This is a Tutorial of how to make the Motec work on cars converted from GTL to GTR2
Convert your GTL Car to GTR2 I use a GTR2-GTL Convertor.
Study the file structure you must have the car name in the .cas file and in cockpit file.
eg Mini.cas with Mini_cpit.gtr (must be in this format or thing will not work)
You need these files for the GTR2 Motec to work
FNTCMOTL.BMP
FNTCMOTM.BMP
FNTCMOTS.BMP
MOTECL.TGA
MOTECNL.TGA
Download from the link below
http://www.mediafire.com/file/69ktfdxdl1m4dfp/Motec+files.7z
Put the downloaded "Motec files" folder in the car folder being converted
Using a Mini as an example but SUBSTITUTE IT WITH ANY CAR YOU ARE CONVERTING IE ESCORT, JAGUAR, CORTINA ETC ETC.
1. From the "Motec files" folder, import the above five files with geditor into Mini_cpit.gtr and save.
2. Open the Mini.cas file with notepad and locate the following lines:
<NOTSPIN><DASHHIGH> INSTANCE=LCDTIMER
<NOTSPIN><DASHHIGH> {
<NOTSPIN><DASHHIGH> MOVEABLE=TRUE
<NOTSPIN><DASHHIGH> MESHFILE=Mini_LCDTIMER.GMT COLLTARGET=FALSE HATTARGET=FALSE LODIN=(0.0) LODOUT=(15.0) SHADOWRECEIVER=TRUE
<NOTSPIN><DASHHIGH> }
Change to
<NOTSPIN><DASHHIGH> INSTANCE=MOTEC
<NOTSPIN><DASHHIGH> {
<NOTSPIN><DASHHIGH> MOVEABLE=TRUE
<NOTSPIN><DASHHIGH> MESHFILE=Mini_MOTEC.GMT COLLTARGET=FALSE HATTARGET=FALSE LODIN=(0.0) LODOUT=(15.0) SHADOWRECEIVER=TRUE
<NOTSPIN><DASHHIGH> }
Save and exit .cas file.
Open the file again and note the gmt "Mini_MOTEC.GMT" this is the file that will load the GTR2 Motec.
3. Now locate the old file Mini_LCDTIMER.GMT it is in Mini_cpit.gtr do this with geditor highlite it and export to desktop. Rename it to Mini_MOTEC.GMT then copy it to the main car folder you are converting.
GTR2 WANTS NAMING MOTEC FOR IT TO WORK. ( LCDTIMER IS FOR GTL ONLY.)
4.Ok now with 3dsimed import the file Mini_MOTEC.GMT in main car folder.
Zoom in with mouse and right click the pink lcd panal. Select Material lcdtimernl you will see this:
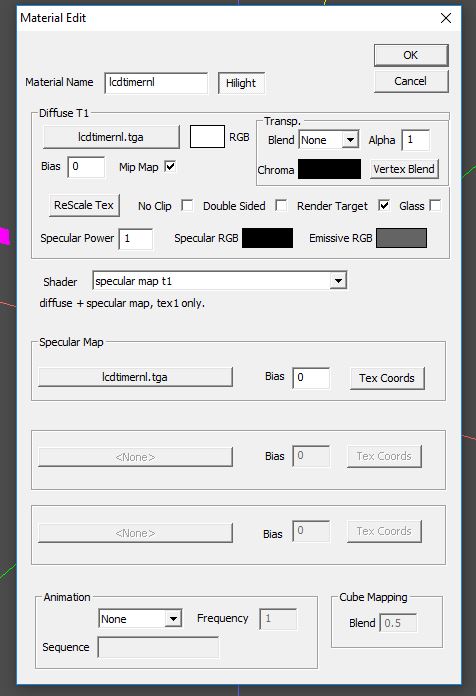
Change the material name to motecnl (must be this or no worky)
select both lcdtimernl.tga buttons navigate to your folder "motec files" in main car folder and select motecnl.tga for both see below:

select ok / then export / GTR2 / save model data / OK / Save to /mini car folder /save and overwrite.
NEARLY THERE NOW
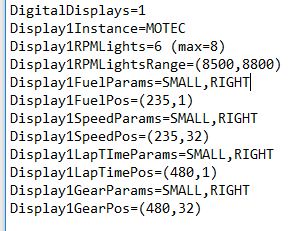
IN EVERY .CAR FILE PUT THESE LINES THIS TELLS THE MOTEC WHAT TO DISPLAY
HUDFuelVolumeRange=(0.0, 80.0, 135.0, 402.5) <---------------- PUT DIGITAL DISPLAY LINES UNDER HUD
DigitalDisplays=1
Display1Instance=MOTEC
Display1RPMLights=6 (max=

<-----------IF SHOWS SMILEY SHOULD BE AS SHOWN BELOW
Display1RPMLightsRange=(8500,8800)
Display1FuelParams=SMALL,RIGHT
Display1FuelPos=(235,1)
Display1SpeedParams=SMALL,RIGHT
Display1SpeedPos=(235,32)
Display1LapTImeParams=SMALL,RIGHT
Display1LapTimePos=(480,1)
Display1GearParams=SMALL,RIGHT
Display1GearPos=(480,32)
SAVE AND EXIT
Every thing should now work, check every step carefully when done checking the files are where they should be.
If all works fine to tidy up import the Mini_MOTEC.GMT in the main car folder into the Mini_cpit.gtr file then delete the original.
Its a bit complex at first but I have now done 3 cars with this method they all work fine.
I would copy and past this tutorial to a text file then print it out to follow step by step.
If it does not work its normaly a naming issue or a mismatch of files.
Hope this helps.