[quote="GeeDee"]This is the read me for this useful tool:
--------------------------------------------------------------
Grid & Colours 3 Template tool by GeeDeeYou will need your paint program and 3DSimEd to make this work.
Please note that all references to 3DSimEd are for the versions before v3 as I am not really familiar with that version yet.Uses:1… Use in conjunction with your paint program and 3DSimEd for more accurate placing of lines and decals.
2… Makes it much easier to work out the alignment of patterns and text between different parts of a template.
3… Will help you see where parts of a template are that have not been mapped.
How to use.Open your preferred painting program and load the file
Grid_&_Colours_3 - 1024x1024.psd or
Grid_&_Colours_3 - 2048x2048.psd depending on the size of the template you will be using with it.*You can use this with smaller templates also, just keep the same screen size.This consists of 4 layers.
1… a grid that you can turn the TRANSPARENCY up or down or on and off to suit.
2… There are 3 different layers of colour that you can turn the TRANSPARENCIES up or down or on and off to suit.
The coloured layers used together (I find using just 2 at a time is enough) will produce many shades of colour that help you distinguish which part of the Template matches with what part of a the car when added to your template that you are using when loaded onto 3DSimEd. The grid part makes it easy to pinpoint the approximate area within a colour very easily (saves using numbers!).
NEXT 1 (paint program).Load up your template and add 4 new layers to it. Now you can copy and paste the layers from the
Grid & Colours 3 Template tool to it.
With the Grid Layer and just one of the coloured layers turned on adjust the transparency so you can see the details of the mod template and still see the grid pattern. When satisfied turn on another coloured layer and adjust that transparency until you can see details of the mod template and the colours of the template tool clearly.
Now save your work as a PSD file and also a DDS file so you do not lose it
NEXT 2 (3DSimEd)Load up 3DSimEd and then drag and drop the chassis GMT file from the mod you are using on to it, it should now load this.
Depending on how the chassis and DDS file have been formed it will give one of 2 different results with this. It will either show the car in its correct livery or it will not have a livery at all and just be a pink shape.
Note: Most times the body will have the
Shadow and the
Collision layers showing (
black) and these get in the way, so right click on a black part then where it says hide layer then chose the layer. Do this on both layers.
If it shows the livery 1st time then you should now see the grid and colours on it that you added. The grid is very handy now as it can show where any stretched polygons are that need to be avoided or that will need more detailed work
Read this part if the livery does not show:Make sure you hid the Shadow and Collision layers first.
Right click on the body of the car and a Material Edit Window will show:
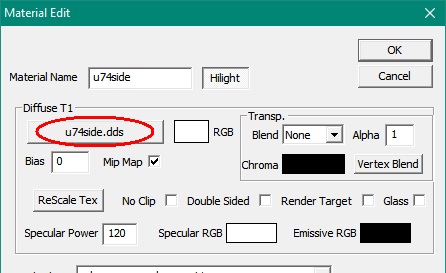
The file highlighted by the red oval is the file you need to find so press on this and up pops this window:
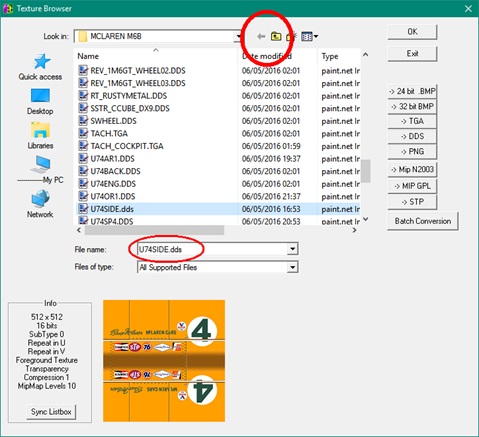
If the file name in the red oval does not show in the list above it then search for it using the arrows highlighted by the red circle. Once you have found the file it will show up like the picture at the bottom of the window.
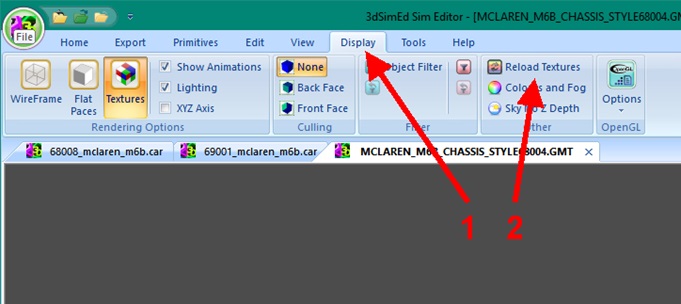
Press OK at the top right of the window once you have it. If it doesn’t show on the chassis that you loaded then on the top 3DSimEd toolbar press
Display followed by
Reload Textures and it should appear. Do this for any other parts you wish to show.
NEXT 3.Now, if you have just saved a DDS file with your latest work on it for the car in the same file you only need press
Display followed by
Reload Textures and your new work should appear refreshed
To show the car with its wheels etc on 3DSimEd you must drag and drop the relevant CAR file into it. Use the procedures above to get the livery to show as described above.
EXTRA HELP, just in case you are unaware of this:If you cannot find access one or more of the files for GMT’s or DDS etc to show on 3DSE because they are in the .GTR files then you will have to get them from the relevant .GTR folder.
If it appears impossible to get the files out then do this simple trick. Load any file into that locked GMT file and that will automatically open it… just remember DO NOT SAVE the GTR folder after you have extracted the files you need or you will have changed the file of course.
If you have any questions regarding this you can PM me on either
www.trackaholics.nstars.org
or
http://www.evolution-modding.com/
Download the tool:
http://www.mediafire.com/download/v6hs2054s94w0nq/Grid_%26_Colours_3_Template_Aid_Tool.zip
Happy designing folks!!


.
.Edited: 06/01/2016 14:45hrs Reason new link to correct file types.


 - downloaded it over at trackaholics